Now a days in IT field, automation is the hot topic and every organization is start adopting the automation tools like Puppet, Ansible, Chef, CFEngine, Foreman and Katello. Out of these tools Ansible is the first choice of almost all the IT organization to manage UNIX and Linux like systems. In this article we will demonstrate on how to install and use ansible tool on Debian 10 Sever.
My Lab details:
- Debian 10 – Ansible Server/ controller Node – 192.168.1.14
- CentOS 7 – Ansible Host (Web Server) – 192.168.1.15
- CentOS 7 – Ansible Host (DB Server) – 192.169.1.17
We will also demonstrate how Linux Servers can be managed using Ansible Server
Ansible Installation on Debian 10 Server
I am assuming in your Debian 10 system you have a user which has either root privileges or sudo rights. In my setup I have a local user named “pkumar” with sudo rights.
Ansible 2.7 packages are available in default Debian 10 repositories, run the following commands from command line to install Ansible,
$ sudo apt update
$ sudo apt install ansible -y
Run the below command to verify the ansible version,
pkumar@linuxtechi:~$ sudo ansible --version

To Install latest version of Ansible 2.8, first we must set Ansible repositories.
Execute the following commands one after the another,
$ echo "deb http://ppa.launchpad.net/ansible/ansible/ubuntu bionic main" \
| sudo tee -a /etc/apt/sources.list
$ sudo apt-key adv --keyserver keyserver.ubuntu.com --recv-keys 93C4A3FD7BB9C367
$ sudo apt update
$ sudo apt install ansible -y
$ sudo ansible --version

Managing Linux Servers using Ansible
Refer the following steps to manage Linux like servers using Ansible controller node,
Step:1) Exchange the SSH keys between Ansible Server and its hosts
Generate the ssh keys from ansible server and shared the keys among the ansible hosts
$ sudo -i
# ssh-keygen
# ssh-copy-id [email protected]
# ssh-copy-id [email protected]
Step:2) Create Ansible Hosts inventory file
When ansible is installed then /etc/hosts file is created created automatically, in this file we can mentioned the ansible hosts or its clients. We can also create our own ansible host inventory file in our home directory,
Read More on : How to Manage Ansible Static and Dynamic Host Inventory
Run the below command to create ansible hosts inventory in our home directory
pkumar@linuxtechi:~$ vi $HOME/hosts
[Web]
192.168.1.15

[DB]
192.168.1.17
Save and exit the file
Note: In above hosts file we can also use host name or FQDN as well but for that we have to make sure that ansible hosts are reachable and accessible by hostname or fqdn.
Step:3) Test and Use default ansible modules
Ansible comes with lot of default modules which can used in ansible command, examples are shown below,
Syntax:
# ansible -i <host_file> -m <module> <host>
Where:
- -i ~/hosts: contains list of ansible hosts
- -m: after -m specify the ansible module like ping & shell
- <host>: Ansible hosts where we want to run the ansible modules
Verify ping connectivity using ansible ping module
$ sudo ansible -i ~/hosts -m ping all
$ sudo ansible -i ~/hosts -m ping Web
$ sudo ansible -i ~/hosts -m ping DB
Output of above commands would be something like below:

Running shell commands on ansible hosts using shell module
Syntax: # ansible -i <hosts_file> -m shell -a <shell_commands> <host>
Example:
pkumar@linuxtechi:~$ sudo ansible -i ~/hosts -m shell -a "uptime" all
192.168.1.17 | CHANGED | rc=0 >>
 01:48:34 up  1:07,  3 users,  load average: 0.00, 0.01, 0.05

192.168.1.15 | CHANGED | rc=0 >>
 01:48:39 up  1:07,  3 users,  load average: 0.00, 0.01, 0.04

pkumar@linuxtechi:~$
pkumar@linuxtechi:~$ sudo ansible -i ~/hosts -m shell -a "uptime ; \
 df -Th / ; uname -r" Web
192.168.1.15 | CHANGED | rc=0 >>
 01:52:03 up  1:11,  3 users,  load average: 0.12, 0.07, 0.06
Filesystem              Type  Size  Used Avail Use% Mounted on
/dev/mapper/centos-root xfs    13G 1017M   12G   8% /
3.10.0-327.el7.x86_64

pkumar@linuxtechi:~$
Above commands output confirms that we have successfully setup ansible controller node
Let’s create a sample NGINX installation playbook, below playbook will install nginx on all server which are part of Web host group, but in my case I have one centos 7 machine under this host group.
pkumar@linuxtechi:~$ vi nginx.yaml
---
- hosts: Web
  tasks:
    - name: Install latest version of nginx on CentOS 7 Server
      yum: name=nginx state=latest
    - name: start nginx
      service:
          name: nginx
          state: started
Now execute the playbook using following command,
pkumar@linuxtechi:~$ sudo ansible-playbook -i ~/hosts nginx.yaml
output of above command would be something like below,
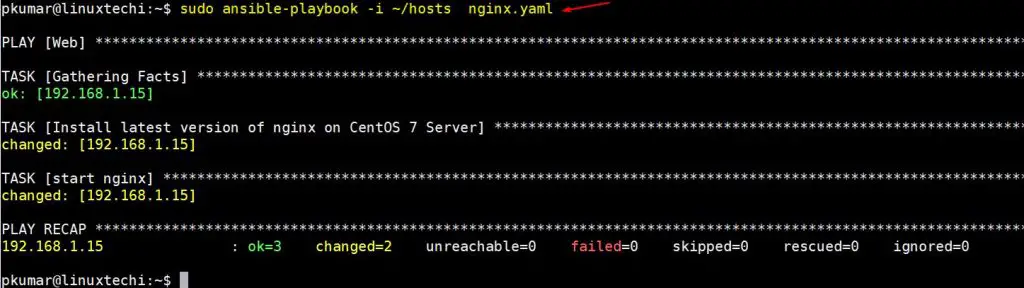
This confirms that Ansible playbook has been executed successfully, that’s all from article, please do share your feedback and comments.
Read Also: How to Download and Use Ansible Galaxy Roles in Ansible Playbook
Read Also: How to Use Ansible Vault to Secure Sensitive Data