KubeSphere is an open-source enterprise-grade Kubernetes container platform that provides streamlined DevOps workflows and full-stack automation. It offers an intuitive and user-friendly web interface that helps developers build and monitor feature-rich platforms for enterprise Kubernetes environments.
In this guide, you will learn how to install Kubesphere on Linux step-by-step.
Step 1) Prepare your Linux System
The first step is to decide which system you will use to install Kubesphere. At the moment of writing this article, the following are the only operating systems that are supported.
- Ubuntu 16.04, 18.04, 20.04, 22.04
- Debian 9, 10
- Red Hat Enterprise Linux 7
- SUSE Linux Enterprise Server 15
- OpenSUSE Leap 15.2
Regardless of the system you choose, ensure that it meets the following minimum system requirements:
- CPU: 2 Cores
- Memory: 4 G ( 8G recommended )
- Disk Space: 40 G
NOTE: It is recommended that you have a clean OS (without any other software installed) to prevent any conflicts.
In this guide, we will use Ubuntu 22.04 as our OS environment with 4 CPU cores, 8GB RAM, and 40GB disk space.
Step 2) Installing prerequisite packages
A couple of package requirements are needed before proceeding with the installation. Therefore, install them as shown.
$ sudo apt update
$ sudo apt install curl socat conntrack ebtables ipset -y
Once installed, proceed to the next step.
Step 3) Download KubeKey
Next, download KubeKey from its Github release page or run the following command:
$ curl -sfL https://get-kk.kubesphere.io | VERSION=v3.0.2 sh -

The above command downloads the latest release of KubeKey (v3.0.2). Feel free to change the version number to download a specific version.
Next, make the kk file executable using chmod command.
$ chmod +x kk
Step 4) Get started with the installation of Kubesphere
To install both the Kubernetes cluster and Kubesphere, use the syntax shown below,
$ sudo ./kk create cluster [--with-kubernetes version] [--with-kubesphere version]
We will specify the latest versions of Kubernetes and Kubesphere as shown. Take note that these versions might be different by the time you read this guide. So, be sure to substitute the versions accordingly.
This is an all-in-one installation and, therefore, you do not need to make any configuration to your system.
$ sudo ./kk create cluster --with-kubernetes v1.24.2 --with-kubesphere v3.3.1 --container-manager containerd
NOTE: If you do not add the flag –with-kubesphere in the command in this step, KubeSphere will not be deployed. KubeKey will install Kubernetes only. If you include the same flag without specifying a KubeSphere version, the latest version of KubeSphere will be installed. Also if you want to install kubernetes v1.24.x then it is mandate to pass –contianer-manager flag.
Once executed, the command runs a pre-check on your node to ensure that the prerequisite packages are installed, and you should see the following table.

To proceed with the installation, type ‘yes’ and hit ENTER to continue

The installation takes quite a while, in our case, this took about 20 minutes. At this point, you can take a break as the installation of Kubernetes and Kubesphere progresses.
Once complete, you will get some information about how you can access the web interface for Kubesphere.
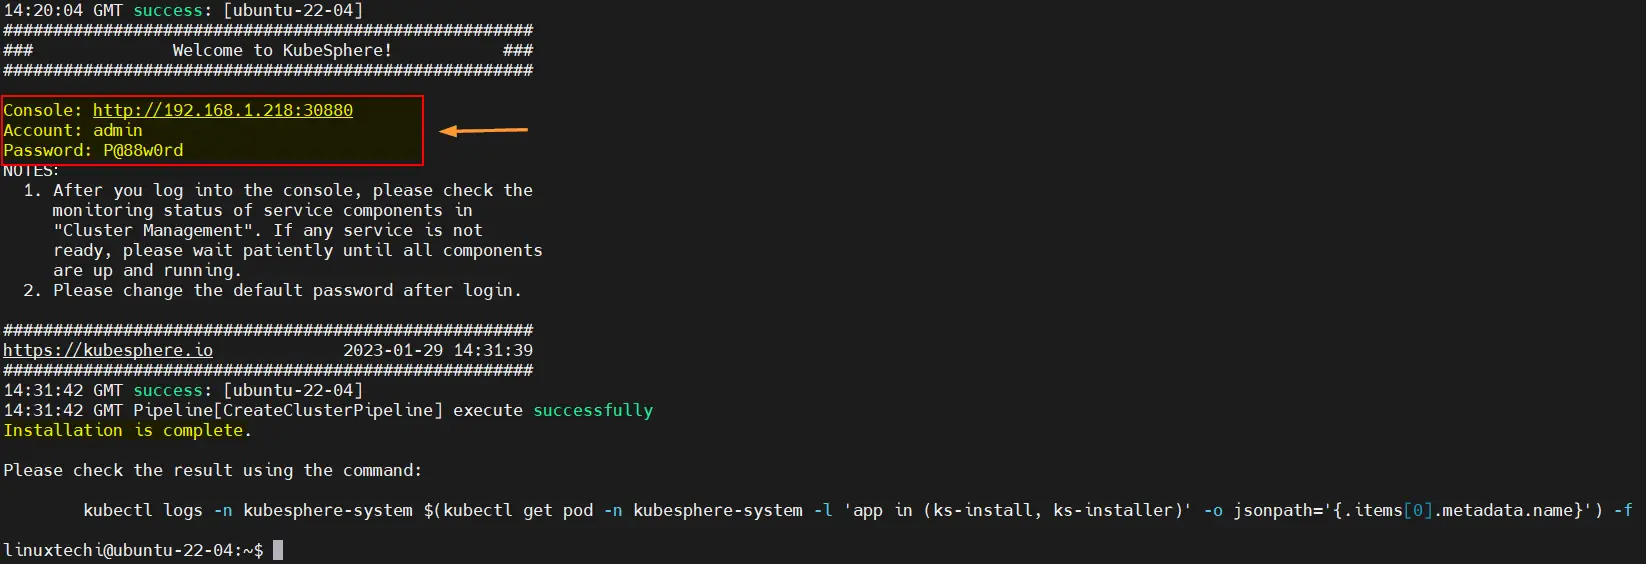
On your browser, head over to the URL provided for accessing the web console. This will get you to the login page shown below. Login using the default credentials shown.
- Username: admin
- Password: P@88w0rd

You will then be required to change your password and provide a unique and stronger one.

Finally, you will be ushered to the dashboard shown below.

To get an overview of your cluster resource utilization, click on ‘Platform’ at the top left corner.

On the menu that appears, select the ‘Cluster Management’ option.

This opens the interface shown that displays the cluster resource usage.

To the left is a menu that provides a list of options for accessing and viewing various components of your cluster. For example, to view the nodes in the cluster, head over to Nodes > Cluster nodes.
Obviously, you will only see one node which works as control and worker node on which you have just installed Kubernetes and Kubesphere.

To view system components, click ‘System Components’

Back on the terminal, run the following commands to interact with cluster (or kubectl commands)
$ mkdir -p $HOME/.kube
$ sudo cp -i /etc/kubernetes/admin.conf $HOME/.kube/config
$ sudo chown $(id -u):$(id -g) $HOME/.kube/config
To get node information, run
$ kubectl describe node

To get information about the pods in all the namespaces on your cluster, run the command:
$ kubectl get pods --all-namespaces

Conclusion:
In this guide, we have demonstrated how to install Kubesphere on Linux, specifically on Ubuntu 22.04. For more information check out the Kubesphere official site.